
Part 3 of a 3-part series on how to supercharge your online content! Learn how to make your online course easier to follow by leveraging simple design techniques: chunking, developing clear goals, and adding in visual aids.
This article is part 3 of a 3-part series where I walk you through a step-by-step process to take your online course content from a “wall of text” to a supercharged, easy-to-digest format.
Part 1: What is Chunking and Why is it Important for Your Online Course?
Part 2: Goals are the Guide to Learning
Part 3: Multiple Means of Representation with Visuals
Goals of this article:
When we talk about visual aids in the context of learning we’re talking about anything that can help a learner grapple with the content — however simple or complex the topic may be. This can be a graphic, chart, image, etc. that you find online (just remember to cite or use open source!), or it can be something that you create yourself. Remember, variability is the norm and everyone learns differently. Supplementing your content with visual aids is essential in order to reach all of your learners — essential for some; good for all.
Stay tuned for an upcoming blog post about how to easily create visual aids for your online content.
It’s important to break up your content by using various elements to support learners. Most likely your online course content started out as text, which is a great way to begin but doesn’t include the support needed to meet all learners. In order to really reach all learners your online course should have a good balance between text, images, video, and audio — something that we’ll go into much more detail in our online programs.

Before you continue, be sure that you have read the first two posts in this series:
Part 1: What is Chunking and Why is it Important for Your Online Course?
Part 2: Goals are the Guide to Learning
Below is the mini-module about baseball that we have been working with in this 3-part series. This time we’re going to add visuals as a way to provide multiple means of expression that will aid the learning process.
The Flow of a Major League Baseball Game
Understanding Goals
- Understand that a Major League Baseball game consists of at least 9 innings
- Understand that one inning has a top half and a bottom half
- Understand that each half inning is played until the defensive team records 3 outs
- Understand that each batter represents an opportunity to record 1 out
An MLB game consists of at least 9 innings
A major league baseball game consists of at least 9 innings of play during which two opposing teams compete to score the most runs. If the game is tied after 9 innings, the teams continue to play extra innings until one team is declared the winner by scoring more runs than the other team.

Each inning has a top half and a bottom half
An inning of baseball is composed of two halves referred to as the “top half” and the “bottom half.” The two teams take turns playing offense (batting) and defense (on the field) each inning. The away team plays offense in the top half, while the home team plays offense during the bottom half.

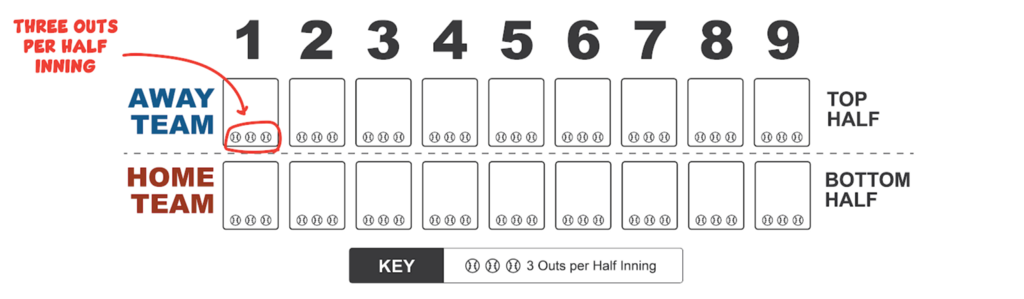
Each half of an inning is played until the defensive team records 3 outs
During their half of the inning, the offensive team has three chances — referred to as outs — to score as many runs as possible. Once the defensive team records three outs, the players swap between offense and defense and begin the next half of the inning. Once an inning is complete, a new inning begins and follows the same pattern until the teams have played at least 9 innings.
Each batter represents an opportunity to record 1 out
Each half inning is played until the defensive team records 3 outs against the offensive team. There are many ways the defensive team might record an out, but in general the following three are the most common:
- when the pitcher “strikes out” the batter
- when a batter hits a fly ball that is caught in the air
- when a player is thrown out while running the bases.

You’ll notice that the images above build upon each other. The first image visualizes 9 innings, then we use the same image to demonstrate the top and bottom halves, followed by 3 outs in each half inning, and finally outlining the offense and defense for each team. Building on the visual in this way helps to scaffold the learner. We could have used only the final image, but it’s fairly complex and likely not easy to take in all at once for learners new to our content.
It’s important to note that you should make sure your images are accessible. This means adding in ALT text for screen readers and ensuring that any text within the image is repeated somewhere within the content so that it is picked up by a screen reader.
You should also check to make sure that colors you are using have sufficient contrast for the learner (e.g., don’t use white text on a yellow background). There is a free tool by WebAIM that allows you to quickly check if your text contrast is compliant.
You can read more about web accessibility guidelines on w3.org.
Let’s take a quick look back at our original content in the first post of this 3-part series. We started with a text outline and built upon that by first chunking our content, then we added goals to help the learner define for themselves what they can expect to learn, and finally we added visual elements as a way to represent the information in multiple ways. If we stopped here we would have a solid piece of content ready to present to our learners. But what else could we do?
This series just scratches the surface of ways to supercharge your online content. What else could we add to this content to engage our learners? It’s really up to your imagination. You could…
I hope that this short series has helped you to begin forming your online content in a way that is beneficial for learners, and also sparked new ideas about how to go beyond what we’ve talked about here. I’d love to hear your feedback in the comments section below.
If you enjoyed this post, visit learningkeyworks.com for more content on how to design flexible online learning environments. If you’re ready to revamp your online course and unlock potential, sign up for our online course — Supercharge Your Online Course.
 Matthew Riecken

support@learningkeyworks.com
Learning Key is committed to providing a website that is accessible to the widest possible audience, regardless of technology or ability. We are actively working to increase the accessibility and usability of our website. In the meantime should you experience any difficulty in accessing the Learning Key website or tools, please don’t hesitate to contact us at support@learningkeyworks.com.